Teriyaki Marinated BBQ Tri tip
If you’ve seen other posts besides that popular one here on my blog, then you’ll notice that I love me some tri-tip. My favorite way to cook up some tri tip is to rub it, smoke it, and then sear it in a cast iron…
BBQ recipes, product reviews, & how-to's
If you’ve seen other posts besides that popular one here on my blog, then you’ll notice that I love me some tri-tip. My favorite way to cook up some tri tip is to rub it, smoke it, and then sear it in a cast iron…

This post is sponsored by the Certified Angus Beef ® brand in conjunction with a social media campaign through Sunday Supper LLC. All opinions are my own. Are you interested in making homemade brisket pastrami? Or looking for a new recipe? I’m guessing its either…

Note: This New York strip steak and shrimp post is sponsored by the Certified Angus Beef ® brand in conjunction with a social media campaign through Sunday Supper LLC. All opinions are my own.
When a special occasion like Valentine’s Day or Mother’s Day comes up, Mrs. Learning to Smoke and I like to stay home for dinner and avoid the crowds. You best believe I work the grill for these occasions! I tend to do some sort of surf n’ turf (steak and shrimp) and it is a hit every year. With that “special occasion” feeling in mind, I share with you this dinner idea for two that is certain to be a winner for you and special someone. Or if you are alone on Valentine’s and are very hungry for two full plates. I don’t judge. For this post I have teamed up with Certified Angus Beef to show you how to grill New York Strip steak and smoked buttery shrimp.

For those of you that follow me on Instagram (@learningtosmoke), you will see that I frequently preach the gospel of reverse searing steaks. With a traditional sear, you crank up the high heat and cook both sides of the steak on the outside, then cook it in the oven until it gets to desired temp. When you reverse sear, you slow cook the steak first and THEN sear to finish. I love to smoke the steak using indirect heat on the grill. Doing this lets me infuse that wood smoke flavor into the steak before searing to lock in those juices and create that tasty, savory crust on the outside.
If the traditional sear is how you have always done it and don’t want to change, that’s fine. But if you’re willing to try new things and enhance the flavor of your steak, then give reverse sear a try!

The New York strip steak comes from the short loin of the cow and is a tender, leaner cut. When looking for a flavorful New York strip steak (or any steak for that matter), make sure to pick the one (or two in this case) that have the most fat interwoven into the meat. Unlike the hard fats on the outside of the steak, these intramuscular fats render into the meat and add some juicy flavor. Also, the thicker the steak the better. Don’t settle for anything less than one inch because that’s just an appetizer.
Now that we’ve covered what it means to reverse sear (for more info on the subject check out my Reverse Searing 101 post) and you have your New York strip steak picked out, let’s get started!
Before prepping the steaks, get the grill going with indirect heat so it can get up to the desired temps in the interim. I usually go 225F for steaks, but since I’m also using for shrimp, I aim for 250F.
For this steak, I’m combining three seasonings: 1 teaspoon kosher salt, 1/2 teaspoon pepper, and 1/4 teaspoon garlic powder. I put them in a small container and mix. Then I grab some with my fingertips and sprinkle on the New York strip steak. I flip the steak over and repeat the process.
When the grill is up to temps, I lay the steaks on the grill grates and let the smoke and low heat do their magic. For smoking wood flavor on steak, I like oak, pecan, or hickory. The length of time to cook varies on size and thickness. Since these were one inch at 250F, they took about 40 to 45 minutes to get to around 120F.

Now that this part is done, it’s time for the sear! I love searing in the cast iron skillet because the the entire surface of the steak will get touched and develop that crust. Searing in a cast iron skillet allows you to add extra ingredients to enhance the flavor of your steak! I’m going with a Tablespoon of butter, a clove of garlic, a sprig of rosemary, and a sprig of thyme. Give the steak about two minutes on both sides and that should do the trick!
An underrated part of cooking steaks is letting the meat rest before serving. This gives the meat time to relax and let juices settle in. Wait about 10 to 15 minutes before slicing. It will be worth it I promise.

We can’t forget the other half of this dynamic duo: the smoked buttery shrimp! This shrimp recipe has been my most popular recipe on my website for a while now. Combining the shrimp with five other ingredients, and a little pecan wood smoke, these shrimp become epic!
The shrimp I buy in the fresh seafood section of my local grocery store comes with the vein removed along the back. When getting it ready for this recipe, I like to leave the tail on. It’s like a little shrimp handle for me and I think provides a nice aesthetic, as well. With that said, get an 8×8 foil pan and start lining the de-shelled (and de-veined) shrimp in the pan. Since we hare doing 15 shrimp, I do three rows of five.

Melt a stick of butter in a separate bowl and mix a clove of minced garlic with it, then pour the mixture over the shrimp. Next I sprinkle some of my favorite rub on the shrimp (feel free to use your favorite rub for these, too. Or a simple salt and pepper mix will do) and then I squeeze a quarter of a lemon all over the pan. I finish with taking two sprigs of rosemary and laying them in between the rows of shrimp laid out.
With the grill at 250F using indirect heat, I place the tray in and check it after 25 minutes. You will know when they are done when they turn from gray to orange. Keep in mind that if they overcook, they will be rubbery to the bite. If you want to get technical, use your digital thermometer and aim for about 120F internal for the best bite.
NOTE: you can smoke both the steak and shrimp in the same grill at the same time as needed.

A twist on a classic surf and turf recipe by smoking the steak before searing and smoking the shrimp will rock your world and that of your special someone!
You can cook the shrimp and steak in the grill/smoker at the same time. The recipe has been adjusted to help the process go quicker.
If you have extra time, let the seasoned steaks rest about 20 minutes before putting in grill. This helps the meat absorb the seasonings before cooking, enhancing flavor.
Feel free to substitute pecan wood for smoking wood of your choice.
Look for good marbling on New York strip steak. It is a leaner cut, so the more marbling you can get the better.
How To Trim a Brisket Ah, brisket trimming. The joyful moments that come cutting off fat and silver skin. While it may not be the most exciting part of prepping, knowing how to trim a brisket is very important. You trim a brisket for multiple…

I have never understood the obsession some people have with prime rib. I’m guessing it’s because the only time I’d see it was when I was a kid and my parents would take our family to some buffet restaurant and prime rib would be the…

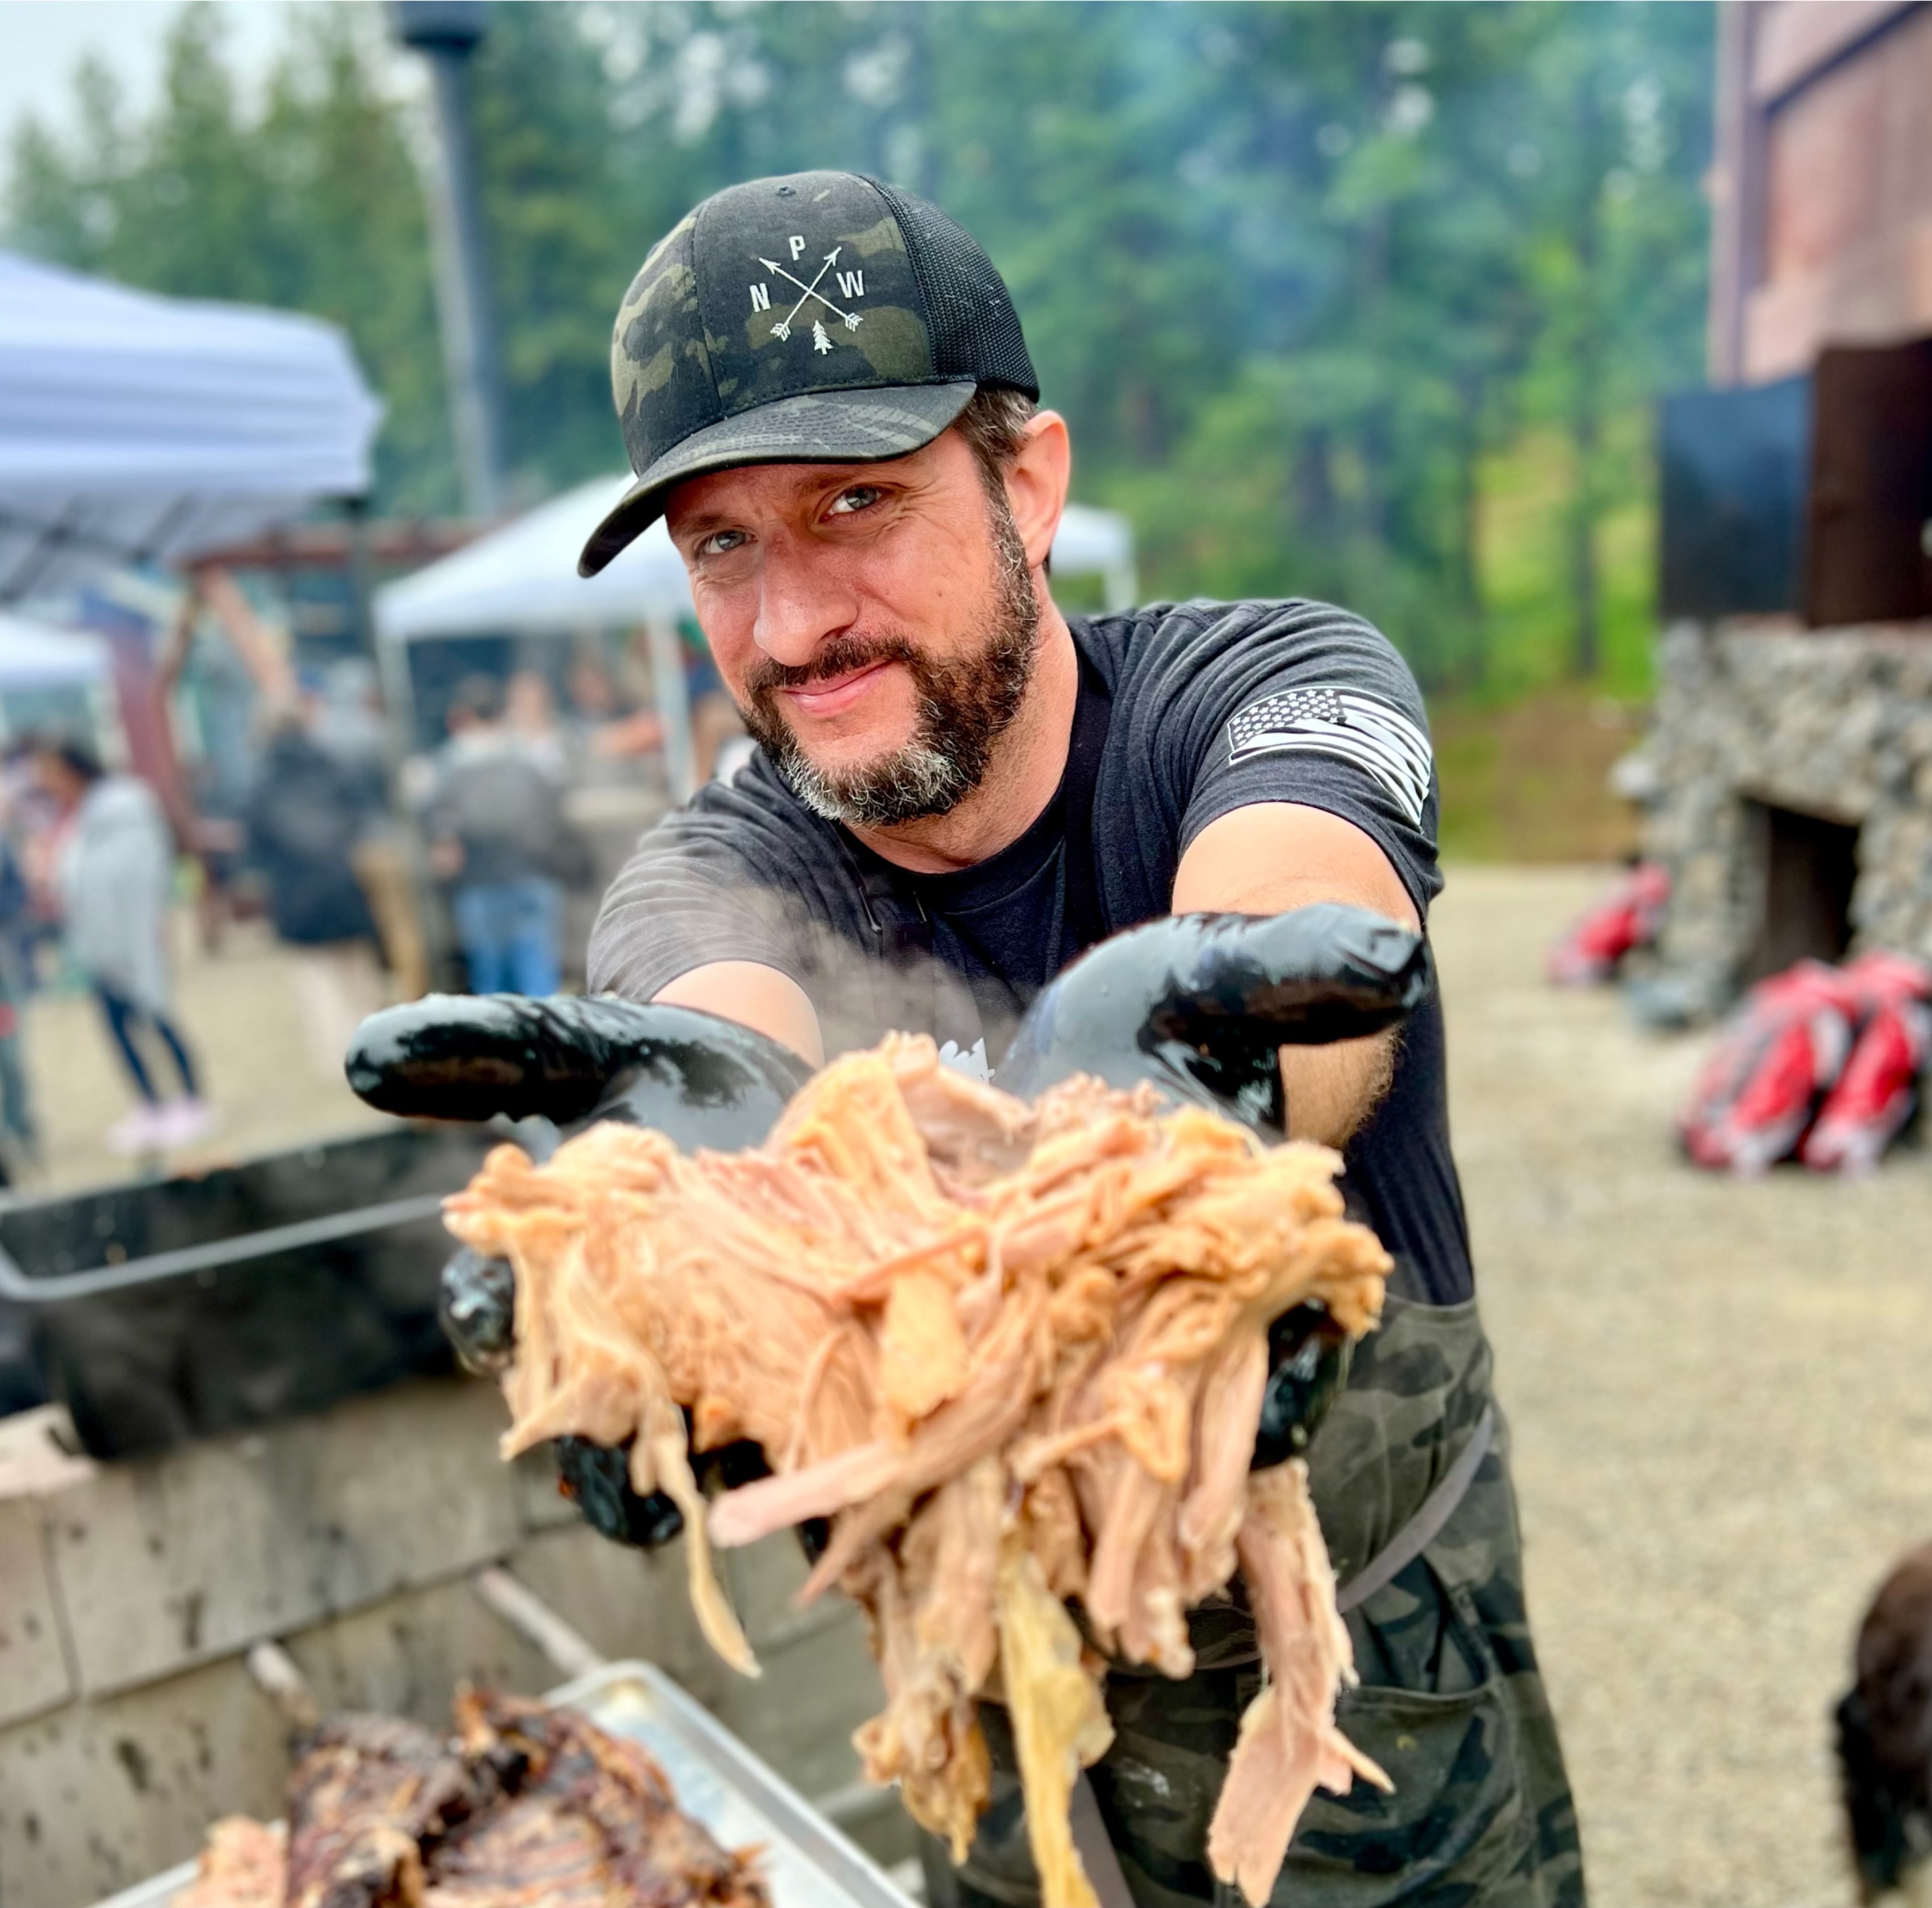
Ever since I got into smoking meat, I’ve been told that brisket burnt ends are the pinnacle of barbecue. To be honest, I never had much of an interest in making them.
After waiting 12-14 hours of smoking a brisket, then letting it rest for at least another hour on top of that, I was not very keen to wait another 90 minutes to two hours for brisket burnt ends. and to eat the meaty goodness I’ve labored (and sometimes starved myself) for.
I’ve had all sorts of good intentions to make this meat candy in the past. However, whenever I slice up the point of the smoked brisket into cubes, they look so good already! Tender to the touch, those meat juices oozing out, the savory flavored bark on the outside, and that classic brisket smell my family and I have been taunted with for hours. I mean how can I wait any longer to eat?

Well, one day I decided to brave it. Exercising the determination of a cornered honey badger, I powered through the slicing of the point and tossed the meat cubes into a pan.
Adding a few other ingredients, I put them back on the grill/smoker at 275F and after about 90 minutes. I had taken these meat cubes and turned them into something worth posting about!
I have tweaked with the ingredients here and there since then and now have a great recipe for how to make burnt ends. Good enough that I feel confident sharing with you folks.
Little nuggets of heaven. That’s what.
Smoking the whole packer brisket (also known as a full) is a topic that could be covered over multiple postings in and of themselves (such as trimming the brisket, fat side up or fat side down, wrapping or no wrapping, etc.). However, I have a brisket recipe right here.
In a nutshell, trim off some of the fat, rub with your favorite rub (or a simple 50/50 mix of salt and pepper), put on the grill/smoker at 250F using your favorite smoking wood (I prefer pecan, hickory, or oak). Let it ride until the smoked brisket hits an internal temp in its thickest spot between 195F to 203F internal.
Use a trusty digital thermometer like the Thermapen ONE for the most accurate temps. Remove and let rest for about an hour before serving.

Now that we have briefly covered that, let’s get into the burnt ends! First off, take the finished smoked brisket and separate the brisket point and the flat. This is done by finding that thick vein of fat which divides the two portions of meat.
Now that the brisket point is separated, start cutting it into cubes, take a sharp knife and slice about one to 1 1/2 inches apart. Place the cubes into a foil pan (I usually go with an 8×8).

With the cubes of smoked brisket in the foil pan, add about one tablespoon worth of your favorite beef rub (or salt n pepper). After that, grab your BBQ sauce and pour on about a cup. Follow up with a teaspoon of Worcestershire sauce, two teaspoons of honey, four tablespoons of butter and three ounces of Dr Pepper or whichever cola you prefer (but seriously, Dr Pepper goes well with barbecue). Add in some brown sugar if you’d like.

Mix the ingredients together in the pan and wrap the top with aluminum foil. Preheat your grill/smoker up to 275F. Hopefully, you have done this during the prep so you have less time to wait. Once at the desired temp, put your foil-wrapped pan on the grill and cook it for an hour.
After one hour, go back to the grill and remove the sheet of aluminum foil. Cook uncovered for another 30 to 60 minutes. We uncover at this point so all of the sauce in the pan will start to reduce and help create some stickiness to the burnt ends themselves.

You don’t want brisket burnt ends to be too saucy because it wouldn’t be much different than just dumping BBQ sauce on cut up pieces of smoked brisket. Let the mix of ingredients cook into the cubes. Its normal to have some juices still in the pan when they are done.

Once the brisket burnt ends have finished cooking uncovered, remove from off of the grill and let them rest for about 10-15 minutes. This will help some of the remaining sauce to thicken some and also let the meat relax so juices can build up a little inside.

To tell if they are done, I like to do the squeeze test. I take a cube and then squeeze down with some pressure. If it shreds apart, then they are cooked well. I also like to have them be a little sticky to the touch. And just like that, now you know how to make burnt ends!

Brisket burnt ends are considered the holy grail of barbecue. Follow this recipe and make your own!
**THE FULL BRISKET WILL NEED TO BE COOKED PRIOR TO MAKING BURNT ENDS**
After burnt ends have cooked for an hour and you unwrap the foil, feel free to drain some of the excess juices in the foil pan
Make sure the burnt ends render when you give them a squeeze.
Aim to have them be a little sticky.
I use Dr Pepper, but feel free to use your favorite cola instead
Substitute brown sugar for cola

In this post, we are all about ham! Even though most of us serve up ham during the holidays or Easter, it’s a friggin’ shame we don’t cook ’em up more often. If you do it right and add your own personal flare to it,…
Another year, another BBQ essentials list! Not to say that the items I shared last time are completely obsolete, but I want to add to the previous list. Consider it an addendum to the previous BBQ Essentials list. Check out more products that I love…

In case you need a refresher, a traditional sear is when you start out cooking food at a high heat, which usually begins around at 500F. Once the meat has been seared on both sides, then it is cooked in the oven until it reaches the desired internal temp. A reverse sear is a method of cooking meat at a low temperature first, usually by smoking or sous vide, then finishing off on a high heat surface.

With smoking, I like to get my grill/smoker to 225-250F using indirect heat and leave the beef or pork chops/steaks in until it reaches an internal temp of 125F (length of time to get there depends on thickness of meat), then move to either a grill above 500F or cast iron pan on the stove (or grill) at high heat. I do about two minutes on one side and then flip the meat over for another two. Doing this creates a flavorful crust on the outside of the meat due to something called the Maillard reaction. The Maillard reaction is a chemical reaction between amino acids and reducing sugars that gives browned food its distinctive flavor. I like my beef medium-medium rare, so I wait to reach an internal temp of 130F (around 137F for pork) before removing.

If starting your cook with the sous vide method, you’ll want to seal the meat and seasonings in an airtight bag (usually done with a vacuum seal) and then place in a warm pot of water that is around 125F. Once again, thickness of the cut of meat matters. For a rule of thumb on how much time to spend cooking it, check out this excellent post from Serious Eats.

Quality. Flavor. Tender. Juiciness. Crust. Go with the reverse sear and you’ll find your steaks suddenly rival those at your favorite steakhouse. It is more cost effective than going out for steak, nor do you have to put on pants and go out in public. I’m just sayin’.

Tomahawk ribeye steaks have grown in popularity and availability in meat departments, but can also get pricey. Want to make sure you get the results you deserve from cooking it? With a few simple ingredients and the reverse sear method, you will look like a grilling expert and serve up some of the best tasting steak you'll ever have!
1. Preheat grill to 225 degrees on indirect heat with hickory wood. Mix kosher salt, black pepper, and garlic powder together then sprinkle evenly on tomahawk ribeye steak
2. Place tomahawk ribeye steak on grill for 90 minutes or until internal temp reaches 125-130 degrees. Remove and sear on high heat on the back of a cast iron skillet for 1-2 minutes on each side. Put avocado oil, garlic clove, and rosemary on skillet before searing steak. Remove steak from grill and place on a large cutting board.
3. Place butter on top of tomahawk ribeye steak and let rest for 15-20 minutes before slicing.
1. Cast iron skillet turned upside down on the grill keeps the elongated bone from the tomahawk ribeye steak from pulling up on part of the steak and ensures the entire surface of the meat gets seared.
2. Feel free to substitute hickory wood for oak or pecan.
Nutrition information isn't always accurate.
If you haven’t noticed from most of the recipes on my website, I like simple. That means I try to maximize flavor with the fewest ingredients possible (mostly. Every once in a while I like to expand my horizons). Lucky for you, this is another one…